Author Archives: Nick Fox

Is your Gps Tracker crashing?

I’m in the process of getting ready for the next major update of Gps Tracker and one of the things I’ve decided to do was to move back to using GET instead of POST with the phones. It’s just much easier to troubleshoot using GET. But, since the app in Google Play now uses GET, any old installations will not work.

I am providing here an apk file that will work with your old installations. Here is how to install it.

  1. Delete the old app from the phone.
  2. Email this apk to the user.
  3. Go to Settings > Security and check “Unknown Sources”
  4. Open the apk attachment in the email

That will reinstall the old version of the program. Here is the apk file. You may need to right click on it to download it. If you have an problem downloading it, leave a comment here and I will email it to you. I apologize for any inconvenience this may have caused you.

Nick

Gps Tracker WordPress Plugin Tutorial 1 – Map

I’ve finally begun building the Gps Tracker WordPress plugin and it is a lot of fun. The way that I’m doing this is by breaking down the functionality into separate plugins and then adding the plugins together at various stages in the build process. It’s kind of like continuous integration, for a one person team, kind of… I think it’s a really good idea to create small plugins that do just one thing, especially when you are just starting off in WordPress plugin development (like I am). I’ve already built the first three plugins, which is the map plugin, the route plugin and the database plugin. I’m currently working on the fourth plugin which is the updater plugin. The first three plugins are standalone plugins but the fourth requires two of the previous plugins (database and route) and therefor will be the first integration point.

If you are totally new to wordpress plugin development, I would like to suggest a couple of pages that will help you come up to speed. The first is “Writing a Plugin” on wordpress.org and the second is Tom McFarlin’s excellent set of tutorials.

Before we dive into the first plugin, I just want to give a brief overview of where I’m going with this, the big picture. I’m going to create a plugin that allows users to track a cell phone, store routes in a database and display the route in real time or allow the user to display previous routes using different map providers (currently set to Google, Bing and OpenStreetMaps). This is my first attempt at building a serious wordpress plugin so it will be as much a learning experience for me as it will be for you. If there are any experienced wordpress plugin developers out there who wish to correct any problems that they see, please feel free to open an issue in my github repo or comment here on any of the plugin tutorials and thank you!

Ok, on to the first tutorial. If you’d like to follow along with the code, you can download it here from github. If you have wordpress installed, you can copy the gps-tracker-map directory into your wordpress plugin directory. Then go to any page or post and add the following shortcode:

[gps-tracker-map]

and you should see a map just like this:

[gps-tracker-map]

In addition to building the map plugin, I will be setting up the structure for all future plugins in this tutorial. The first thing you see in gps-tracker-map.php is that it’s class based and that there is __construct function. This is the constructor for the class and it is always called once when the class is instantiated. Let’s take a look at it:

public function __construct() {
    register_activation_hook(__FILE__, array($this, 'activate'));
    register_deactivation_hook(__FILE__, array($this, 'deactivate'));
    register_uninstall_hook(__FILE__, array($this, 'uninstall'));
        
    // to test this plugin, add this shortcode to any page or post: [gps-tracker-map]  
    add_shortcode('gps-tracker-map', array($this,'map_shortcode'));
            
    add_action('admin_init', array($this, 'admin_init'));
    add_action('admin_menu', array($this, 'admin_menu'));
    add_filter('plugin_action_links_' . plugin_basename(__FILE__), array('Gps_Tracker_Map', 'add_action_links'));
}

The first three lines are hooks. A hook allows you to add custom code to wordpress when certain events happen. As you can see, the three events here are when you activate a plugin, deactivate it or uninstall it. When we register the activation hook, for instance, it will then call the activate function on line 29 of this plugin.

public static function activate() {
    // placeholder for future plugins
}

You’ll notice that the method doesn’t do anything yet but I am adding it now to create the structure of the plugin. The same applies to the two other hooks.

The next thing you’ll see in the constructor above is the add_shortcode function. This is another hook. When you add a shortcode to a page or a post, wordpress will replace the shortcode with code that you create in your plugin. In this case, it will call the function called map_shortcode and display and execute all of the code in that function. We’ll go into detail of what that function does in a minute. Let’s finish up looking at the constructor first. In the next line, there is an add_action function that has an admin_init hook. This event occurs when a user goes to the admin settings page of the plugin and is the first thing that is run. What happens here is that the admin_init function on line 56 of this plugin is called:

public function admin_init() {
    wp_register_style('leaflet_admin_stylesheet', plugins_url('style.css', __FILE__));
}

and what it’s doing is registering a css stylesheet for the admin settings page. The style sheet will be added later when we call wp_enqueue_style. Next we have an add_action for the admin_menu hook. This allows us to create a menu item within wordpress so that you can get to the Gps Tracker plugin settings page.

public function admin_menu() {
    add_menu_page("Gps Tracker", "Gps Tracker", 'manage_options', "gps-tracker", array(&$this, "settings_page"), plugins_url('images/satellite.png', __FILE__), 100);
}

It also puts a little satellite image in the menu so that we can be stylin’ like the rest of the WordPress menu items. You’ll notice the settings_page function name there. When a user clicks on the Settings menu link, that function will then be called.

public function settings_page() {
    wp_enqueue_style('leaflet_admin_stylesheet');
    include 'admin/admin.php';
}

Here we add the admin stylesheet to the admin settings page and then output the settings page with admin.php. Admin.php simply spits out a little bit of html at the moment. We’ll add more later.

<div class="wrap">
    <h3>Gps Tracker Settings</h3>
    <div class="wrap">
        <p>To test this plugin, add this shortcode to any page or post:</p> 
        <p>[gps-tracker-map]</p>    
    </div>
</div>

Finally, we have reached the last line of the constructor! I’ll put it here so that you don’t have to scroll up again:

add_filter('plugin_action_links_' . plugin_basename(__FILE__), array('Gps_Tracker_Map', 'add_action_links'));

You’ll notice that this is a little different than the others. Here we have an add_filter hook. The difference between add_action and add_filter is that add_action hooks are called during wordpress events like when you activate a plugin or when you publish a post, etc. add_filter hooks allow you to pass data through functions. This might occur when you are adding data to the database or sending data to the browser, for instance. Filters change data while actions allow you to do something. So what this filter does is it calls the plugin_action_links hook which allows you to add a link to the plugins page. It does this by calling this function in the plugin:

function add_action_links($links) {
    $links[] = '<a href="' . admin_url('admin.php?page=gps-tracker') . '">Settings</a>';
    return $links;
}

You’ll notice that it returns an array of links which is a clue that its being called by a filter since filters change content. And here is what it does, it adds a Settings link to the plugin page:

Settings Link on WordPress Plugin page

You may be wondering why I went to so much trouble to show you something that seems so trivial. I just wanted to point this out because so many wordpress plugins fail to include this link in their plugins and many times I have a really hard time finding their darn Settings page! I’m sure you’ve experienced that too.

Now we have finally gotten through the constructor and explained most of the code in the plugin and how the plugin is structured. Now we’ll take a look at the final function in the plugin, map_shortcode.

This function is what actually outputs the html, javascript and links to stylesheets and javascript files that we need to display the map. Most of it is fairly understandable if you have knowledge of html and javascript. It starts off with a couple of different function, wp_enqueue_script and wp_enqueue_style. This just outputs the link tag and the script tag to get our css and javascript files. This can include external files from other websites like getting the remote Google maps javascript file:

wp_enqueue_script('google_maps', '//maps.google.com/maps/api/js?v=3&sensor=false&libraries=adsense', false);

or the local leaflet css file:

wp_enqueue_style('leaflet_styles', plugins_url('javascript/leaflet-0.7.3/leaflet.css', __FILE__), false);

Remember that this function replaces the shortcode that you put into a page or a post with html and javascript, so next we create a big html string that contains both. First a div is created for our map (yes, with the style hardcoded into the div tag, we’ll change that later) and then a jQuery function is called that creates the map. Check out the leaflet quick start guide to get a better idea of what’s going on but I’ll briefly step through the code here. First we create a leaflet map object and center it to Seattle:

map = new L.map("map").setView([47.61,-122.33], 12);

You’ll notice that a lot of the code in this section looks similar to the Google maps API but with one big difference. It allows you to create and use different map providers, not only Google, and that is a very big win. There are many parts of the world where other map providers such as Bing or OpenStreetMaps has much better coverage than Google and in addition there are lots of very interesting map providers that you may have never seen before. Next we create our three layers like, for instance, the OpenStreetMap layer:

var openStreetMapsLayer = new L.TileLayer(
"//{s}.tile.openstreetmap.org/{z}/{x}/{y}.png", 
{attribution: "&copy;2014 <a href=\'http://openstreetmap.org\'>OpenStreetMap</a> contributors", maxZoom: 18}
).addTo(map);

There is a known error in leaflet that makes the map freeze up under certain conditions when the zoom buttons are clicked. They have provided a simple workaround until this is fixed and here it is:

// https://github.com/shramov/leaflet-plugins/issues/62
L.polyline([[0, 0], ]).addTo(map);

And finally we add our layers to the control in the top right hand corner of the map which allows us to select which map provider to view. Check the live map above to see what I’m talking about.

map.addControl(new L.Control.Layers({
    "Bing Maps":bingMapsLayer,
    "Google Maps":googleMapsLayer,
    "OpenStreetMaps":openStreetMapsLayer
}));

And that about covers it for our map plugin. Next on board, we’ll take a look at the route plugin which allows us to send gps data from our phone to the Gps Tracker plugin. For the full list of tutorials in this series, please visit the tutorial page here on websmithing.

Check out the first video in our Gps Tracker How-To Series!

I’m pleased to announce that I have created the first video in my new series explaining how the Gps Tracker application works. This first video focuses on the android client since that is by far the most popular platform. The series is going to comprise both a written tutorial and a video tutorial. All of the video tutorials will be on my youtube channel. You can subscribe to my channel to get notified when I create a new tutorial. The android video tutorial is here:

How the Android Gps Tracker Client Works Video on Youtube

and the written tutorial is here:

https://www.websmithing.com/2014/04/23/how-the-gpstracker-android-client-works/

How the Android Gps Tracker Client Works

I finally had the time to rewrite the android client and to get the background service working as I’ve wanted to for a long time. Gps Tracker is now based on work I had done previously on my other website, mycelltracker.com. The big difference between the old mycelltracker app and the new Gps Tracker is the introduction of Google Play location services.

With that I want to go into an in-depth discussion of how Gps Tracker now works on Android devices. We’ll start by looking at the structure of the application beginning with the five classes used in the app. I’ll first give a brief description of each. Here are the class files on github if you want to follow along:

GpsTracker android client class files on github

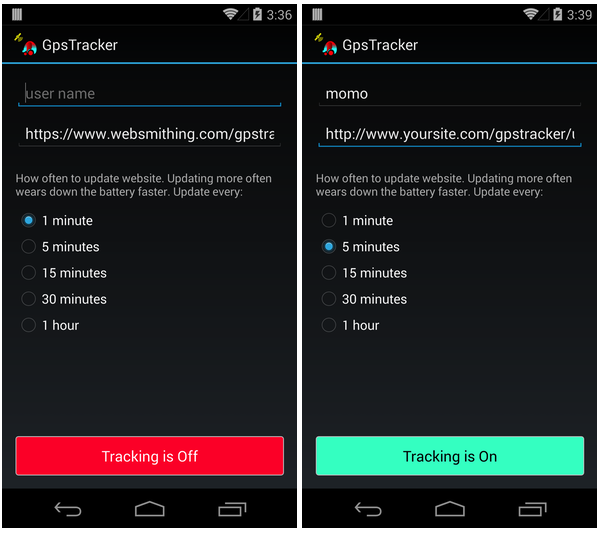
GpsTrackerActivity – This is the one and only screen of the application. It displays two text fields. One for the user name and one for the upload website. There are a set of radio buttons that allow the user to set the interval (from one minute, 5, 15, 30, 60). And there is a start tracking button.

Android Gps Tracker

GpsTrackerAlarmReceiver – This class has an onReceive method that is called periodically from a repeating AlarmManager. When the method is called, the background service is started.

GpsTrackerBootReceiver – This class also has an onReceive method that is called but this one is called when the phone is rebooted. When the method is called, it creates a new AlarmManager. The AlarmManager starts the background service periodically using the receiver class above.

LocationService – This background service is called periodically from the AlarmManager above. When it starts, it uses google play location services to get the location of the device and send it to the update website using an open source asynchronous http client library. The service then terminates itself.

LoopjHttpClient – This class wraps a third party library that does asynchronous http calls.

The first thing that happens is that the main activity starts up and in onCreate, a sharedPreference file is opened and the currentlyTracking variable is set:

SharedPreferences sharedPreferences = this.getSharedPreferences("com.websmithing.gpstracker.prefs", Context.MODE_PRIVATE);
currentlyTracking = sharedPreferences.getBoolean("currentlyTracking", false);

This is an important variable and will be used throughout the application. When onResume is called, two other methods are called. The first is displayUserSettings which just restores the UI to its previous state and the second is setTrackingButtonState which displays the correct button state (either tracking or not tracking). When a user taps on the start tracking button, the currentlyTracking variable is set to true and the method startAlarmManager is called:

    
private void startAlarmManager(Context context) {
    Log.d(TAG, "startAlarmManager");
    Context context = getBaseContext();
    alarmManager = (AlarmManager)context.getSystemService(Context.ALARM_SERVICE);
    gpsTrackerIntent = new Intent(context, GpsTrackerAlarmReceiver.class);
    pendingIntent = PendingIntent.getBroadcast(context, 0, gpsTrackerIntent, 0);

    alarmManager.setRepeating(AlarmManager.ELAPSED_REALTIME_WAKEUP,
        SystemClock.elapsedRealtime(),
        intervalInMinutes * 60000, // 60000 = 1 minute
        pendingIntent);
}

In this method, a repeating AlarmManager is created and the interval is set to the variable intervalInMinutes. intervalInMinutes is chosen by the user using the radio buttons on the screen. The interval is set to 1 minute, 5, 15, 30 or 60. The AlarmManager class is an interface to the phone’s system alarm services and allows us to run code at a specific time even if the GpsTracker app is not running. In this method, we create a pending intent which allows AlarmManager to run our code using our application’s permissions. So what happens here is that every one minute, for instance, the alarmManager will execute the onReceive method of the GpsTrackerAlarmReceiver class.

Let’s take a look at the GpsTrackerAlarmReceiver class. First of all you’ll see that it extends the WakefulBroadcastReceiver class. This is very important. This is a helper class that creates a partial wake lock. Creating this wake lock insures that the cpu doesn’t go back to sleep while the background service is running. You need to set this permission in the AndroidManifest file:

<uses-permission android:name="android.permission.WAKE_LOCK" />

As you can see the GpsTrackerAlarmReceiver class is very simple, with only one method.

public class GpsTrackerAlarmReceiver extends WakefulBroadcastReceiver {
    private static final String TAG = "GpsTrackerAlarmReceiver";
    @Override
    public void onReceive(Context context, Intent intent) {
        context.startService(new Intent(context, LocationService.class));
    }
}

When the alarmManager calls the onReceive method it starts the LocationService background service. If it’s already started, like if you have the interval set to one minute, then it only calls the onStartCommand method in the LocationService class. As long as the phone is running, the alarmManager will continue to start this service over and over again, get the phone’s location and then send the location to your update website.

What happens if somebody turns the phone off and then back on again, will we still get location updates? Well, glad you asked and the answer is yes, so let me show you how it’s done. There is another class called GpsTrackerBootReceiver which extends BroadcastReceiver. This time we will not use the wakeful receiver because all we are doing is creating a repeating alarmManager. This is a very fast operation and since we are not starting a service as in the previous class, we do not need to create an additional wake lock.

Note also that we are checking the variable currentlyTracking:

        
if (currentlyTracking) {
    alarmManager.setRepeating(AlarmManager.ELAPSED_REALTIME_WAKEUP,
        SystemClock.elapsedRealtime(),
        intervalInMinutes * 60000, // 60000 = 1 minute,
        pendingIntent);
} else {
    alarmManager.cancel(pendingIntent);
}

if we are currently tracking (as set by the user in the gpsTrackerActivity screen when they tap on the start tracking button), then start the alarmManager, otherwise cancel it.

This broadcast receiver’s onResume method is called every time the phone is rebooted. We’ll need to look at the AndroidManifest.xml file for a moment to see how that happens.

<receiver android:name=".GpsTrackerBootReceiver">
    <intent-filter>
        <action android:name="android.intent.action.BOOT_COMPLETED" />
    </intent-filter>
</receiver>

Here you can see we have registered a receiver with the name of our class, .GpsTrackerBootReceiver (don’t forget the period before the class name), and this receiver has a filter that says only listen to BOOT_COMPLETED events. So every time the phone is rebooted, call my onReceive method.

While we are looking in the AndroidManifest, note that GpsTrackerAlarmReceiver is also registered and the LocationService as well:

<service android:name=".LocationService">
</service>

This brings us to the next class in the application, the LocationService. This class extends Service and runs on the main thread of the application. It runs in the background and will continue running even if the application shuts down. Since it runs on the main thread, any long running operations should be on their own threads or else the user could experience having the app’s UI freeze up (something you want to avoid…). This service does two things:

a) gets the phone’s location using Google play location services
b) sends the location data to the upload website

The first operation uses the requestLocationUpdates method of the LocationClient class to start getting location data from the phone. When the phone has a location that meets the criteria that we specify then it returns that location back to a callback method. That method’s name is onLocationChanged. This all happens asynchronously so we never have to worry about freezing up the UI with this operation.

The second operation uses this cool open source library:

Android Asynchronous Http Client

written by James Smith. As you can see from the name of the library, this allows us to make http calls asynchronously so once again, we don’t have to worry about tying up the UI. Also, this library handles being called from a background service. One less thing we have to worry about.

So when the service starts, it calls onCreate (like an activity) and then calls onStartCommand. If the service is already running and something else tries to start the service, a new service is not created, what happens is onStartCommand is called again. This is where I call the startTracking method from:

@Override
public int onStartCommand(Intent intent, int flags, int startId) {
    if (!currentlyProcessingLocation) {
        currentlyProcessingLocation = true;
        startTracking();
    }
    return START_STICKY;
}

I first check the variable currentlyProcessingLocation. If the service has already been started (which might happen when we have an interval of one minute) then we don’t want to call startTracking twice. Sometimes it can take more than a minute to get that first satellite fix if we are using gps. So, the moment we start tracking, we set that variable to true and that solves the problem. START_STICKY means that if the service is somehow killed, then the system will restart the service and the service can continue doing what it’s supposed to do.

The next thing we do is create our locationClient. Once the client is connected we can then create a LocationRequest object in the onConnected callback method. Let’s take a look at the properties we are setting on the locationRequest object:

@Override
public void onConnected(Bundle bundle) {
    Log.d(TAG, "onConnected");

    locationRequest = LocationRequest.create();
    locationRequest.setInterval(1000); // milliseconds
    locationRequest.setFastestInterval(1000); // the fastest rate in milliseconds at which your app can handle location updates
    locationRequest.setPriority(LocationRequest.PRIORITY_HIGH_ACCURACY);

    locationClient.requestLocationUpdates(locationRequest, this);
    }

We set our interval to 1 second and our priority to PRIORITY_HIGH_ACCURACY. This means get the highest accuracy possible as quickly as possible. So the phone will be trying to get it’s location from the google play’s fused location provider. Fused means that the location can be coming from either gps, wifi, cell towers or other means. In the new google play location services, you no longer worry about which provider to use, you simply tell it what accuracy you want and it will figure it out on it’s own. I tell you this is a welcome relief from how things have been in the past. Stackoverflow has countless questions about which provider to use (gps vs. wifi vs. cell tower etc…) and it has always been a serious point of confusion for lots of developers, so good riddance.

You’ll notice that I’m using requestLocationUpdates instead of something like getLastLocation. I wanted the ability to filter my location by accuracy. That’s why I have the if block here in the onLocationChanged method:

if (location.getAccuracy() < 100.0f) {
    stopLocationUpdates();
    sendLocationDataToWebsite(location);
}

to only accept a location that has an accuracy of 100 meters or better. This can be adjusted to fit your own needs. onLocationChanged is going to be called about once a second (since we’re using requestLocationUpdates), so once we have a location that meets our criteria, let’s send that location to the update website and shut down the service.

In the sendLocationDataToWebsite method, we create a RequestParams object, which is part of the loopj async http library and set all of our parameters for our POST http operation. We do our async post and on either success or failure, we shut down the service with this line:

stopSelf();

One thing you’ll notice within the sendLocationDataToWebsite method is a little if/else block that checks if firstTimeGettingPosition is true. If it is true, then we need to save our latitude and longitude to shared preferences only. If it’s not true, then we need to create a new location object with our previously saved latitude and longitude. Once we have this, we can use the distanceTo method of the Location class to figure out how far we have moved since the last location update. This allows us to calculate our total distance traveled.

if (firstTimeGettingPosition) {
    editor.putBoolean("firstTimeGettingPosition", false);
} else {
    Location previousLocation = new Location("");

    previousLocation.setLatitude(sharedPreferences.getFloat("previousLatitude", 0f));
    previousLocation.setLongitude(sharedPreferences.getFloat("previousLongitude", 0f));

    float distance = location.distanceTo(previousLocation);
    totalDistanceInMeters += distance;
    editor.putFloat("totalDistanceInMeters", totalDistanceInMeters);
}

editor.putFloat("previousLatitude", (float)location.getLatitude());
editor.putFloat("previousLongitude", (float)location.getLongitude());
editor.commit();

When the alarmManager reaches its interval again, the background service is recreated and the whole process starts again. This process works well on larger intervals such as five minutes, on shorter intervals like one minute, there is a chance that it could take google play location services a longer time to get a location fix that meets our criteria. What I’m getting at is that for shorter intervals, it might be less of an energy drain to keep the background service running continuously and keep google play location services running continuously. It may be less of a battery drain. The two scenarios need to be tested.

As the application stands now, I think it’s a good starting point for any further work. It works reliably and periodically in the background and restarts when the phone reboots. This would be a good starter app for other apps. If you want to see this app in action, you can download it from google play:

https://play.google.com/store/apps/details?id=com.websmithing.gpstracker

and then start tracking. Then go to the test webpage and search for your username in the routes dropdown box below the map. It should be near the top of the list:

https://www.websmithing.com/gpstracker/displaymap.php

The full source code can be found in my repo on github in the phoneClients android directory.

How to set up the Gps Tracker MySql database using phpMyAdmin

This problem has plagued a lot of people. I even made a video in 2008 explaining how to use phpMyAdmin. I just watched it again and it’s still relevant 6 years later. Check out the video on my youtube channel, it’s only four minutes and will help:

Google Map GPS Cell Phone Tracker and PhpMyAdmin

The following are the written instructions for those who prefer it. The first thing you need to do is create a new database. When you have the name of the database, make sure and change it in the php connection file:

https://github.com/nickfox/GpsTracker/blob/master/servers/php/dbconnect.php

$dbhost = 'localhost';
$dbuser = 'gpstracker_user';
$dbpass = 'gpstracker';
$dbname = 'gpstracker';

You need to make sure all those values are correct.

Next take a look at the sql script in the github repo, you’ll first want to cut and paste the CREATE TABLE command into the SQL tab of phpMyAdmin. After you’ve created the table, you’ll want to add all the stored procedures. When you look in the sql script, you’ll see something like this for the procedure prcGetRouteForMap:

CREATE DEFINER=`root`@`localhost` PROCEDURE `prcGetRouteForMap`(

This is generated automatically by mySql but should not be used if you are creating the procedure by hand. This is how the procedure should be run:

CREATE PROCEDURE prcGetRouteForMap(
_sessionID VARCHAR(50),
_phoneNumber VARCHAR(50))
BEGIN
  SELECT
  CONCAT('{ "latitude":"', CAST(latitude AS CHAR),'", "longitude":"', CAST(longitude AS CHAR), '", "speed":"', CAST(speed AS CHAR), '", "direction":"', CAST(direction AS CHAR), '", "distance":"', CAST(distance AS CHAR), '", "locationMethod":"', locationMethod, '", "gpsTime":"', DATE_FORMAT(gpsTime, '%b %e %Y %h:%i%p'), '", "phoneNumber":"', phoneNumber, '", "sessionID":"', CAST(sessionID AS CHAR), '", "accuracy":"', CAST(accuracy AS CHAR), '", "extraInfo":"', extraInfo, '" }') json
  FROM gpslocations
  WHERE sessionID = _sessionID
  AND phoneNumber = _phoneNumber
  ORDER BY lastupdate;
END

Note that the DEFINER is now gone. Now look in the lower left hand corner of the SQL tab of phpMyAdmin. Do you see the delimiter box? Remove the semi-colon ; if there is one and add two forward slashes // to the box. Do this for each of the stored procedures (total of 6) and you’re almost done. Finally do the INSERT INTO command and insert the location data into the db. Now are you done setting up the database. The next step is to test your installation by going to the following page:

http://www.yoursite.com/gpstracker/displaymap.php

on your website. You should see the red message at top saying “Choose a route below” and with that you should be good to go. Just point one of the phone clients to your updatelocation.php file and start receiving updates.

Android Version of Gps Tracker Now in Google Play Store!

Finally something that has been requested for some time, the android version of GpsTracker is in the Google Play Store:

Gps Tracker on Google Play

https://play.google.com/store/apps/details?id=com.websmithing.gpstracker

This version has many significant enhancements. The most important is that it now has google play location services running in a background service. Also, location updates will restart automatically if the phone is restarted. Please download and test the app and let me know how it works! If you want to have a look at the source code, you can find it here:

https://github.com/nickfox/GpsTracker/tree/master/phoneClients/android

Gradle build problem with Android client

Hey Everyone,

I’ve been getting reports of gradle build problems with the Android project. The file in github is the most up to date and should be used now:

https://github.com/nickfox/GpsTracker/blob/master/phoneClients/android/GpsTracker/build.gradle

Please note there are two gradle.build files, you need the one in the GpsTracker directory.

Please let me know if you encounter any other problems.

Recent outages on websmithing

Hey everyone, I want to apologize about the recent outages on websmithing.com. I was installing an ssl certificate so that I could serve https and installing it was a bit of a challenge.

Developers please note that this website is now using https and all test urls need to be changed on the phone or they won’t work.

https://www.websmithing.com/gpstracker/updatelocation.php

Search for this string in the phone source code.

Nick

Gps Tracker nominated for “Project of the Month” on Sourceforge!

I was very happy to learn that GpsTracker was one of the top 9 downloaded projects on Sourceforge and was nominated for Project of the Month.

If you have checked out the project and like it, would you please log into Sourceforge and vote for GpsTracker:

http://sourceforge.net/p/potm/discussion/vote/thread/7d522915/

VOTE: gpsmapper

voting ends February 2, 2014

Thank you very much!
Nick

Help! I lost my cell phone.

First off, I’m sorry that you lost your cell phone. That is a bummer. At this point, I’m sure you have retraced your steps and have tried calling your cell phone to see if someone kind hears it and picks it up. You can call your cell phone from your computer using Google voice if you do not have access to another phone:

https://www.google.com/voice

If it’s a real emergency (ie. a missing person), then you should contact the police and they in turn might be able to contact the phone company and find the phone’s location.

At this point, if you are still unable to find your cell phone I will cut to the chase and let you know where you stand.

If you did not have any tracking software installed and activated on your phone before you lost it, you most likely are not going to find it.

Sorry for the bad news but that’s the way it is and I really don’t want you going to another website that promises to find your phone for a fee or is simply trying to get at your personal information.

One more thing to mention, it’s important to contact your cell phone provider and let them know your phone is missing. Ask them to put a hold on your account so that you don’t incur any charges that may be made on the phone.

Also, if you have thoughts of chasing somebody who has stolen your cell phone, please be careful. In today’s world, you just don’t know if someone is going to pull out a weapon and use it against you. I’m just suggesting that you might not want to provoke someone into doing so. Your life and safety is much more valuable than a cell phone.

Now if you haven’t lost your phone yet but want to protect it then please keep reading…

If you have an iPhone or any kind of newer Apple mobile device then Apple has you covered with this, Find My iPhone:

http://www.apple.com/icloud/find-my-iphone.html

Make sure you set that up on all of your apple devices.

If you have an Android cell phone, I recommend installing this, Where’s My Droid:

https://play.google.com/store/apps/details?id=com.alienmanfc6.wheresmyandroid

This is by far the most widely used application for finding lost Android phones. The basic version is free and it works just fine. Google has come out with something new called Android Device Manager. It’s very similar to Apple’s Find my iPhone but it’s not yet out on all android cell phones (January, 2014). To see if it’s on yours check out this support page from Google and use the Android Device Manager if your phone has it:

https://support.google.com/accounts/answer/3265955?hl=en

If you have a Windows Phone, Microsoft has created this site to help you find your cell phone:

http://www.windowsphone.com/en-us/how-to/wp7/basics/find-a-lost-phone

Finally, if you have an old java phone (think old Razr flip phones), the only application that I could find to track those old phones is put out by Mcaffee. Unlike the other three applications I mentioned above, this product costs money. I have not used it and only present it here as a solution if you have an older java phone.

https://www.wavesecure.com/products/java.aspx

That covers just about any cell phone that is out there right now.

And finally, always use a passcode to get into your phone. Don’t worry, you’ll get used to it. Besides protecting a huge amount of your personal information, it will make it a lot harder for someone to get into your phone settings and turn off tracking. That may give you just enough time to locate your phone with one of the online trackers you have set up.

If you have any questions at all that weren’t covered in this post, please feel free to ask and good luck in finding your phone.